
With OblyTile, a friendly utility created by xda-developers.com user Argony-OT, any Windows 8 user can apply beautiful, custom tiles to their Windows 8 Start Menu.
The main feature of Microsoft’s new Windows 8 operating system is undoubtedly the new Start Menu, which acts as a launcher for all of your frequently-used applications. By default, only official “Windows 8 Apps” from the Microsoft Store fully support the new “tile” launcher icons on the Start Menu. OblyTile removes this limitation.
My Custom OblyTile Icons

I’ve spent some time creating my own custom Windows 8 Start Menu tiles. All of them are based off of content I’ve found on Google Images, then edited in Photoshop. I’ve created a package containing icons from the following applications:
- Ableton Live
- Antichamber
- ArmA II
- ArmA II Operation Arrowhead
- Assassin’s Creed 3
- Bioshock Infinite
- Chivalry Medieval Warfare
- Chrome
- Dark Souls
- Dolphin
- Dream Pinball 3D
- Euro Truck Simulator 2
- Far Cry 3
- FIFA 12
- Garry’s Mod
- Guild Wars 2
- Hitman Absolution
- League of Legends
- Portal
- Scribblenauts
- SimCity
- SimCity 4
- Sonic and All Stars Racing Transformed
- StarCraft II HOTS
- Team Fortress 2
Download: Zach’s Windows 8 OblyTile Icons – Pack 03
- Chrome
- Crysis 3
- Ghost Recon Online
- Mumble
- Origin
- Steam
- Unified Remote
- VLC
Download: Zach’s Windows 8 OblyTile Icons – Pack 02
- AudioSurf
- Battlefield 3
- Beat Hazard
- CouchPotato
- Counter Strike Global Offensive
- Crysis
- Darksiders
- Dead Space 2
- DiRT 3
- DreamWeaver
- Encore
- Fallout New Vegas
- Google Music Manager
- Just Cause 2
- LightPack
- Mass Effect 2
- Mirror’s Edge
- Natural Selection 2
- Need for Speed Hot Pursuit
- OneNote
- Picasa
- PowerPoint
- Premiere
- Rayman Origins
- Red Orchestra 2
- Restart
- SABnzbd
- Saint’s Row 3
- Shift 2 Unleashed
- Shutdown
- SickBeard
- Skyrim
- StarCraft II
- Trine 2
Download: Zach’s Windows 8 OblyTile Icons – Pack 1
Applying Your Custom Icons in OblyTile
- First, download OblyTile from Argony-OT’s thread on XDA-Developers.com here. The download link is at the bottom of his post. Alternatively, here’s a direct link.
- Open OblyTile.
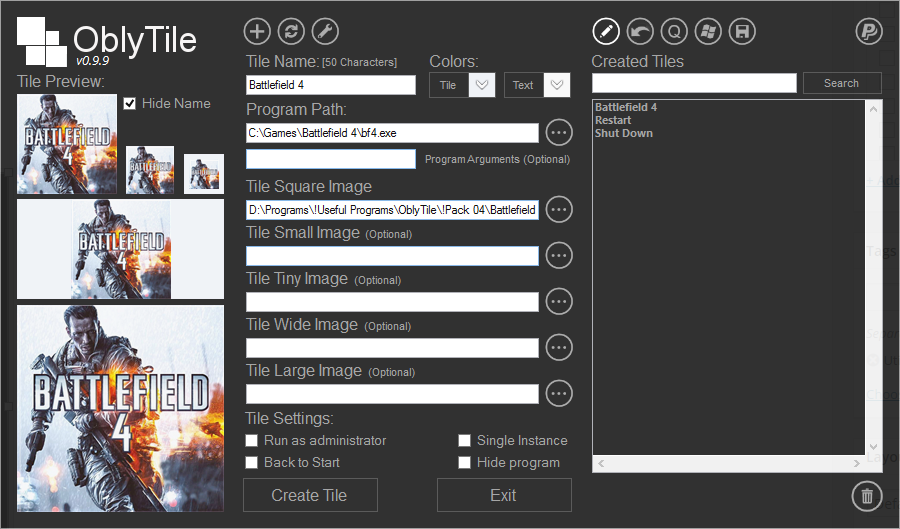
- Fill out each box with relevant information. I’ll use Battlefield 3 in the following example.
- In Tile Name, enter your application name, i.e. “Battlefield 3.”
- I like my icons nice and clean, so I like to check the box that says “Hide Tile Name.”
- Under Program Path, click the “…” button to choose a file or folder to launch. In the case of Battlefield 3, I’m going to click “Choose File.”
- Find the location of the file or folder you want to launch. For my installation of BF3, I’m going to find “C:\Games\Battlefield 3\bf3.exe”
- Leave Program Arguments blank, unless you are an advanced user and know what to input here.
- Under “Tile Square Image,” click the “…” button to choose a large icon. Find the icon you downloaded from me, or choose an icon you’ve created.
- “Tile Background Color” only applies if your icon has transparent elements – only a couple of mine do, such as LightPack. If you’d like your icon to have a specific background color, select it here.
- Click “Create Tile”, then “Pin as Square Tile”. Check out your new, awesome Start Menu tile!
Enjoy!