
It’s quite difficult to settle on comfortable audio input/output settings from within Windows. All audio hardware is different, and there are many factors that play into how audio playback sounds to your ears and how your microphone input sounds to others. This is a guide to setting up your audio devices to achieve maximum comfort for you and your listeners.
I work at a VR company called High Fidelity, where audio I/O is critical to a powerful experience. Our audio spatialization technology is designed for maximum immersion and realism. If one person is speaking so loudly that they are causing audio distortion, while another person’s microphone is set such that they are extremely quiet, everyone in the virtual space will find themselves in an uncomfortable and unpleasant situation.
While this guide is focused on making sure High Fidelity on Windows sounds good, these concepts can be used to tune your I/O settings for maximum comfort across all applications.
If you already know what an audio input and output device is, how they plug in to your computer and how to modify Windows’ audio settings, you’ll really only need the “Guide to Perfection” below and the section titled “A Few Important Tips About Microphones”. Feel free to skip around using this Table of Contents:
Table of Contents
Guide to Perfection
Here are the basics of perfecting your audio I/O settings:
Perfecting Output
- If applicable, set your output device’s physical level settings to 3/4 of maximum
- Set Windows’ output volume to 5%
- While listening to known-good source material such as this YouTube video, continue increasing Windows’ output volume until you’re comfortable.
- If you find that you have to raise Windows’ settings above 90% for a comfortable listening experience, set your Windows’ output volume to 0%, set your output device’s physical level settings to maximum, then repeat steps 2 and 3.
Perfecting Input
- If applicable, set your input device’s physical gain/level settings to 3/4 of maximum.
- Put the microphone at a comfortable distance away from your mouth
- This is important! If the mic is too close to your mouth, your voice will sound distorted and “breathy”.
- Set Windows’ Levels setting to 50% with 0dB of mic boost.
- Do one of the following:
- If you’re using headphones as your audio output device, use Windows’ built-in “listen to this device” feature (see here for more instructions on this).
- If you’re using speakers as your audio output device, use Audacity to start recording from the input device.
- Speak normally into the input device.
- Increase Windows’ Levels setting to a maximum of 100% until you hear yourself comfortably (see here for more instructions on this).
- If you’re still too quiet with the Levels setting at 100%, raise your input device’s physical gain/level settings until you hear yourself comfortably.
- If you’re still too quiet with the Levels setting at 100% and the device’s gain at maximum, raise Windows’ Mic Boost setting until you hear yourself comfortably.
A Primer to Audio I/O Devices
Audio Input Devices
An audio input device is any software or hardware device that accepts an output signal from another device. Examples of audio input devices include:
- A USB microphone, like a Blue Yeti Nano
- A microphone with a 3.5mm plug, like this Zalman clip-on mic
- Your sound card’s “Stereo Mix” or “What U Hear” device
- Think of these devices as if they were microphones being held up to your speakers while they output sound
Audio Output Devices
An audio output device produces a signal that drive another device’s input. Examples of audio output devices include:
- Desktop computer speakers
- Headphones
- Huge speakers in a movie theater
Physical I/O Device Interfaces

The image here shows a common layout for audio I/O interfaces on the back of your computer. Audio devices can plug into your computer in various ways, including:
3.5mm Port
3.5mm audio jacks are used to interface with both audio input and audio output devices. You’ll find one of these jacks on some smartphones, the side of your laptop, or on the front/back of your computer.
Most of the time, you are meant to plug output devices into the green/”Line Out” jack, and you’re meant to plug to plug input devices into the pink/”Mic In” jack.
USB Port
Many computer headsets plug into a USB-A or USB-C port on your computer. The USB interface can act as both input and output.
SPDIF Port
Many receivers accept uncompressed digital audio via an optical cable plugged into your computer’s SPDIF Out port. This interface isn’t as common as the two above.
Modifying Windows’ Settings
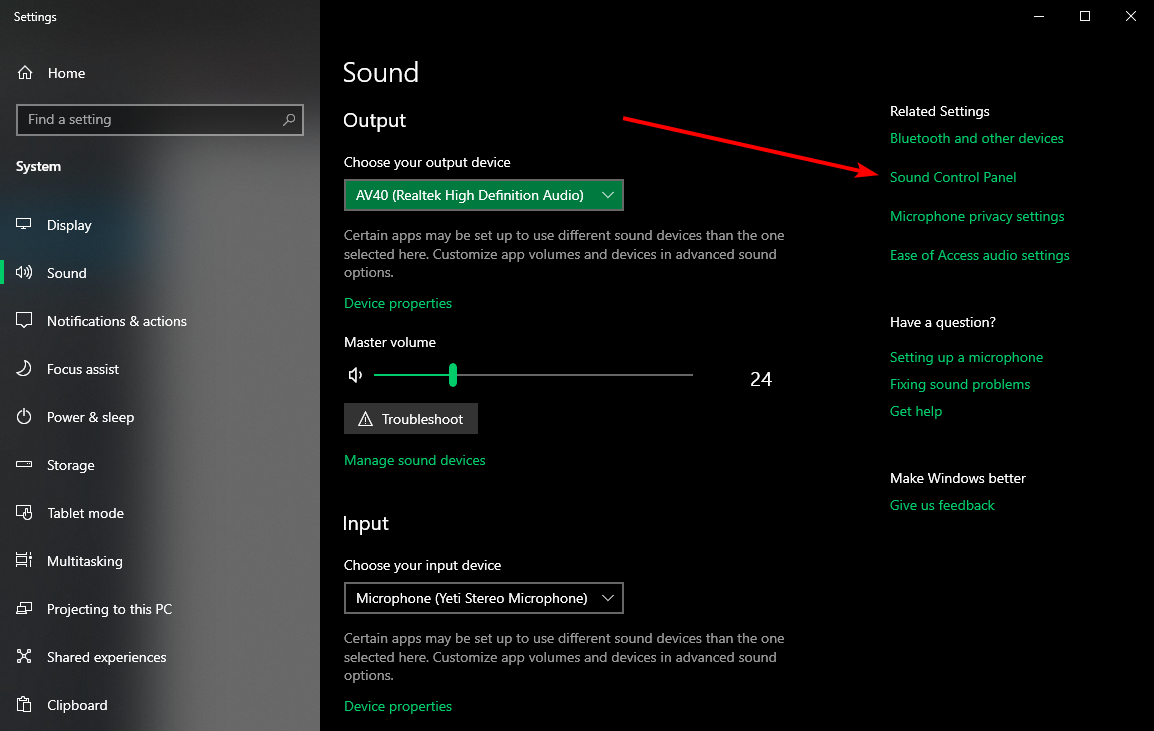
In Windows 10, there are many ways to access your audio I/O device’s settings. We care about only one of those ways: the Sound Control Panel. Microsoft hid this panel in a recent Windows update and chose to expose a less powerful way of modifying your device’s settings. I consider this to be a terrible move because of the importance of these settings, but I digress 🙂
The easiest way to access your audio I/O device’s settings is as follows:
- Right click the speaker icon in your system tray at the bottom right of your screen
- Click “Open Sound Settings” in the resultant menu
- Click “Sound Control Panel” under “Related Settings” on the resultant screen
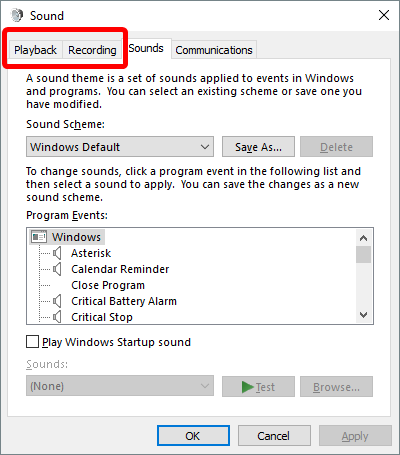
To modify audio input device settings, click the “Recording” tab. To modify audio output device settings, click the “Playback” tab.
The Recording Tab

Here, you’ll see a list of all input devices you have installed on your system. In the image above, I have the following:
- 1x “Microphone – Realtek Audio” device
- This device is associated with the headset microphone I have plugged into the back of my computer via the pink 3.5mm “Microphone” port.
- The bar on the right of the window is green because I was blowing into the mic at the time of this screenshot, maximizing the input levels
- 1x “Line In – Realtek Audio” device
- This device is associated with the blue “Line In” 3.5mm port on the back of my computer
- 1x “Stereo Mix – Realtek Audio” device
- Again, think of this device as if it was a microphone being held up to my headphone speakers while they output sound
- 1x “Microphone – Rift Audio” device
- This device is associated with the microphone on the front of my Oculus Rift VR headset
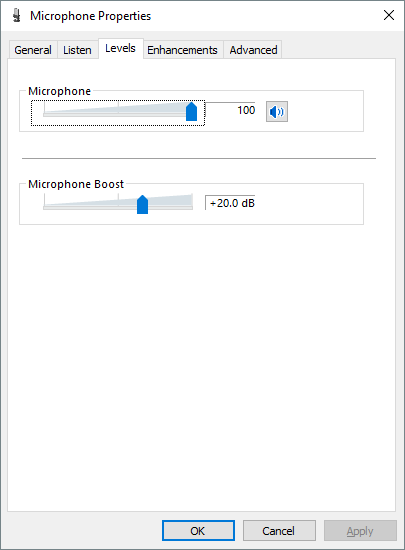
Recording Levels
To modify the Windows “levels” (input volume) of your input device, right click on a device, click Properties, then click on the “Levels” tab.
Listen to Yourself
There’s a setting built in to Windows that allows you to hear what your microphone sounds like to others. This setting is located in the “Listen” tab of the Device Properties popup:
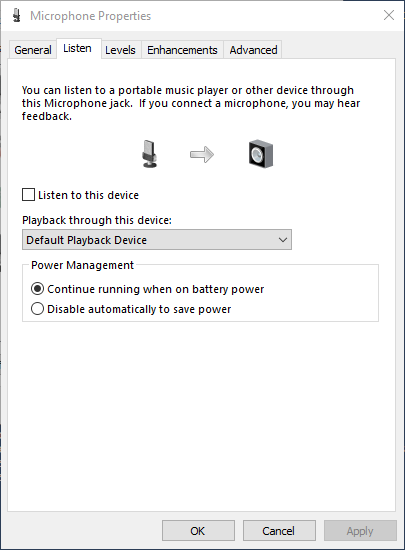
Check the box labelled “Listen to this device” to hear what you sound like to others. Be careful about checking this box if you’re using desktop speakers, as nasty feedback can occur in that case!
Default Devices
Notice above that my “Microphone” device is listed as the “Default Device” and has a green check mark next to its icon. This means that Windows applications will prioritize using my headset’s microphone as my audio input device first, unless the application has some manual override set. This is very important to understand – if you run an application or game and your microphone isn’t working, it may be because your “Default Device” is set incorrectly. To change your default device, right click a device in the list and click “Set as Default Device”.
Disabling an Input Device
If you don’t want a device to show up in a list of audio devices from within some other application, you can disable it. Do so by right clicking on the device, then clicking “Disable”. I do this with devices I know I’ll never plug anything into in order to prevent my device list from getting cluttered.
A Few Important Tips About Microphones
It’s a huge challenge to setup your microphone so that you’re comfortably audible to the people you’re talking to in your external application or game. Here are a few important things to keep in mind when using a microphone:
- Don’t get too close! Microphones are sensitive pieces of equipment. If you’re still too quiet when using your microphone, that’s almost always a Levels/Gain problem and not a microphone-distance problem.
- Don’t put the microphone right in front of your mouth unless you have a pop filter and know what you’re doing. Without a pop filter, your Ps and other harsh sounds will make your listeners uncomfortable with annoying “pops” and bursts of energy.
- Beware of signal clipping! If you’re too loud, or your input levels are set too high, you will cause signal clipping which sounds terrible and uncomfortable to listeners. Here’s a visual representation of a normal microphone signal (green), then a clipped signal (red):
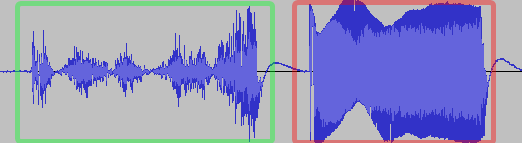
It’s very common for mics on VR headsets to exhibit signal clipping, mainly because of how close the microphone is to your mouth. When using a VR headset, be careful to not speak too loudly, or your voice will exhibit signal clipping no matter what your Windows settings are set to.
The Playback Tab
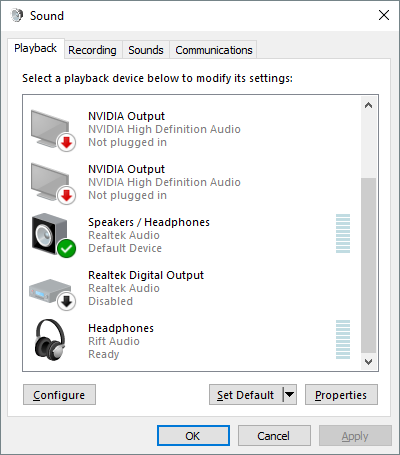
Here, you’ll see a list of all output devices you have installed on your system. In the image above, I have the following:
- 2x “NVIDIA Output – NVIDIA High Definition Audio” devices
- These are devices associated with my graphics card’s HDMI ports. If I had a device with speakers plugged into one of those HDMI ports, Windows wouldn’t show that device as “Not plugged in”
- 1x “Speakers / Headphones – Realtek Audio” device
- This device is associated with the headphones I have plugged into the back of my computer via the green 3.5mm “Line Out” port.
- 1x “Realtek Digital Output – Realtek Audio” device
- This device is associated with the SPDIF port on the back of my computer.
- 1x “Headphones – Rift Audio”
- This device is associated with the headphones connected to my Oculus Rift VR headset
Both the “default device” and “disabled” device states on the “Recording” tab are analogous to the corresponding state under the “Playback” tab – see above for more explanation.
That’s It!
Now that you have an excellent understanding of Audio I/O devices in Windows, read the “Guide to Perfection” section at the top of this page. Then enjoy having well-calibrated I/O settings!
Please leave a comment below if you have any questions!
Well done Zach. Thank you for sharing.
Thank you! 😊